Disclaimer
Hi, just letting you know that all products recommended here have been used by us, or are properly researched to ensure they are the best you are getting without bias.
We are also an affiliate for certain Amazon products and thus some links here are affiliate links. If you purchase an item through any of them, we MAY earn a commission at no extra cost to you.
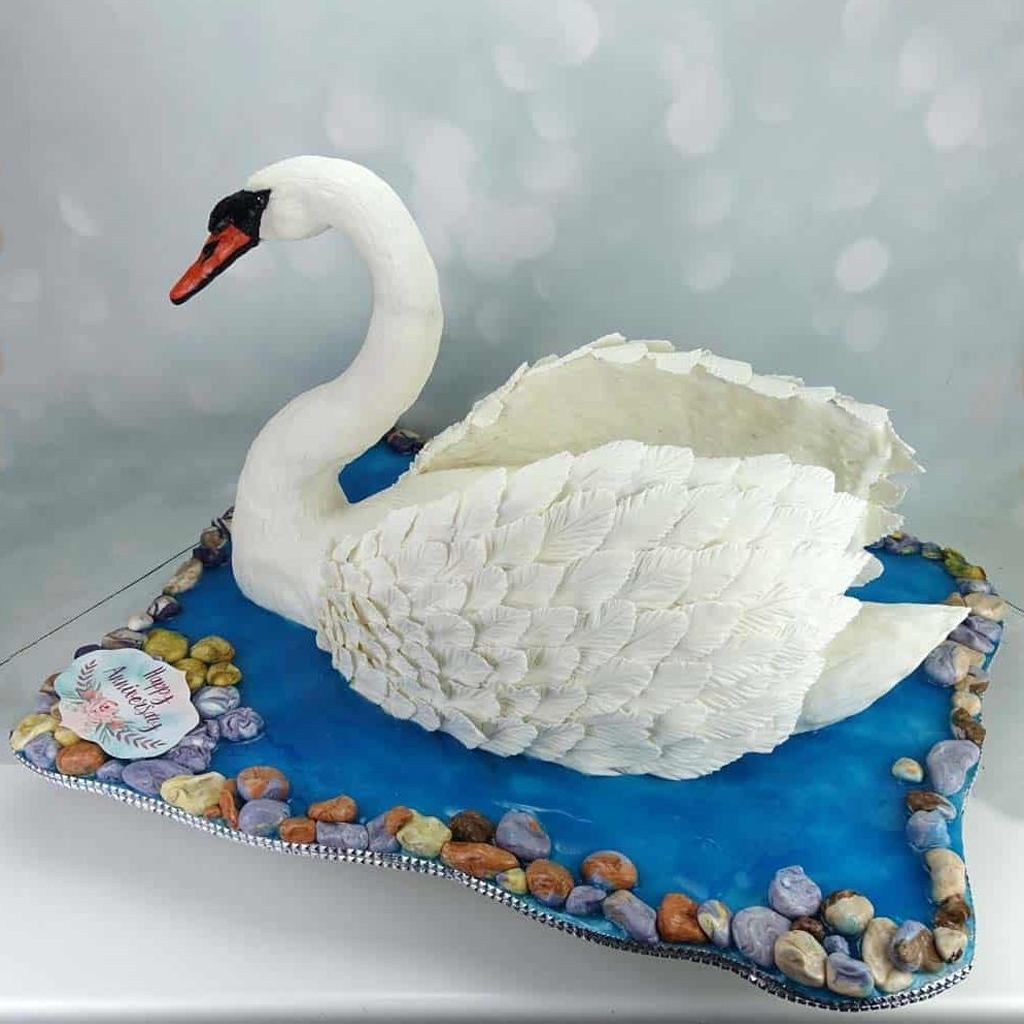
Are you a swan lover or you have got someone who can’t stop fawning over this beautiful creature? Let’s say you want to make a cake for your party or that of someone else and you need new design ideas; I have got the perfect thing for you. Let me share with you a simple, yet unique cake idea you can try all by yourself at home. It’s a swan-themed cake that looks and also tastes divine.

Why Swan-Themed Items Are Amazing
Okay, maybe you are wondering just why a cake with a swan theme or even why the whole trend of swan-themed items all around. The thing is, swans represent a lot of things which humans love to relate to. Having an item that is inspired by the swans not only makes one feel classy, it also keeps reminding us of some qualities of the swans which we can emulate and become better humans. Some of these intriguing qualities include:
- Loyalty and devotion
- Survival ability
- Teamwork
- Strong love
- Communal living
- Shared responsibility among a couple
- Gentle care for young ones
- Etc
Hey, I have got a full post right here for you to read up the amazing qualities of the swans. Trust me, you will find them quite intriguing. Hit this link to see them.
How To Make An Edible Swan-Themed Cake All By Yourself
You may want to make your party a special one by adding a touch of class and bringing a cake in. Not just any cake though, but one designed with an embodiment of love, loyalty and more. I can bet you this cake would turn eyes at your party. So if you want to make your own swan-themed cake by yourself at home, allow me to put you through how to achieve this without stress.
Making your own swan cake in easy steps
Making a swan cake involves meticulous steps since sections of the cake would be made at different times during baking before finally joining them together. To simplify the process, I will put you through the making in a step by step process so let’s dive in. This one is baking every part from the scratch so you might want to roll up your sleeves till the end.
What you need:
First, you should know that the best swan cakes are usually made with ginger biscuits, buttercream, meringue, royal icing and other things that make up the cake base.
Don’t worry, I will explain how you can get all these and the ingredients. Additionally, you need cake tins, greased and lined with baking parchment and also a piping bag with a nozzle for adding the final design.
Note that you can just save yourself the extra time and get a swan-shaped cake pan. Or you could go through baking the major parts of the body and assembling them to form your swan at the end. I will show you how to do the two so you have nothing to worry about. Now let’s get to baking.

Step 1 – Making The Cake Base:
You need to make the base of the cake first before any other part. To make a moderate-sized cake base, the ingredients needed are:
- 1 teaspoon of ginger syrup
- 2 cups chopped pecans.
- 1 stick of unsalted butter.
- 2 cups of soft light brown sugar.
- 4 large eggs.
- 2 teaspoons of vanilla extract.
- 3 cups of sieved all-purpose flour.
- 1 teaspoon baking powder.
- pinch of salt.
Preparation
- To make the cake base first, heat the oven to about 70 degrees Celsius and allow it to heat while you mix the batter.
- Next, in a bowl, mix the butter and sugar together until they become pale in colour.
- Afterwards, add eggs a little at a time and mix gently.
- In the same bowl. fold in the chopped pecans, flour, baking powder, vanilla extract, salt and ginger syrup little by little.
- Mix very well until everything is properly mixed. If you feel your cake batter is too thick, add one small egg. You can add a little warm water if you choose. If the batter is too watery, add little flour.
- Get your greased pans and divide this between two pans and bake for about half an hour until risen and springy to touch. Try to avoid opening the oven too often to prevent it from collapsing in.
- Use a clean toothpick or knife to dip in the centre to confirm it is properly cooked. If the object comes out clean, remove the cake and cool for about two minutes on a wire rack.
Step 2 – Making The Buttercream:
Buttercream is a soft mixture of butter and sugar used inside and on top of cakes. This is a good addition as it would make you cake yummy to taste and also improve the design. Ingredients for the buttercream include:
- 1 stick of unsalted butter
- 1/4 cup of icing sugar
- 3 1/2 tablespoons of milk
- 1 teaspoon vanilla extract
- 1/8 teaspoon of baking rum (for preservation and is optional)
Preparation
- To make the buttercream, you need either an electric whisk or a mixer to beat the mixture.
- Get a bowl and add the butter and icing sugar. Use the mixer to properly mix them until it gives a fine texture.
- Gradually add the vanilla extract, rum and milk. The milk will make the frosting smooth and spreadable. So you can always add more milk till you get your desired consistency.
- Keep stirring till everything is properly mixed.
- After this, get your cake base and place the cakes on a cake board.
- Layer them up with the buttercream and put the cake in a fridge to chill.
- There should be leftover buttercream and it must be kept at room temperature but covered.
Step 3 – Making The Gingerbread:
Gingerbread is a sweet cake or soft biscuit flavoured with ginger. This will definitely add a distinct taste to your cake while also giving the shape of your swan cake’s head and neck. The ingredients for the gingerbread are:
- 125g of unsalted butter
- 125g of soft light brown sugar
- 1 tablespoon of golden syrup or black treacle
- 190g of flour
- 1 teaspoon of soda bicarbonate
- 2 tablespoons of ground ginger
- 2 tablespoons of mixed baking spices
- 2 large eggs.
Preparation
- To make the gingerbread, first melt the butter, sugar and golden syrup in a pan before allowing to cool slightly.
- Next, mix the flour, soda bicarbonate, ginger and baking spices together.
- Beat the eggs and add them to the mixture while mixing it until all are evenly done.
- Then chill the dough for about half an hour.
- Finally, heat the oven to about 200 degrees Celcius and roll the dough to a thickness of 3mm, then cut out about 30 cm length of this dough for the head and neck.
- Be sure to make the swan head and neck in advance and pinch the head at the end to make a beak.
- Also, insert a skewer halfway up to the neck and cut to length while leaving about 8 cm to poke into the cake to hold the neck up.

- Shape the small crown for its head and thereafter leave them to harden for a while.
- Bake for about ten minutes and allow it to cool once it is properly cooked.
Step 4 Making – The Meringue:
A meringue is a sweet white mixture made from egg whites and sugar, usually baked until crisp. This will serve as the feathers of your swan. To make a meringue for your swan cake, you need:
- 4 large egg (just the whites)
- 1/2 cup of caster sugar
- A small quantity of edible glitter
- 1 teaspoon of lemon juice (this will give you a sturdier meringue that is less prone to dripping)
Preparation
- The first step in making meringue is to heat the oven to about 110 degrees Celcius.
- Whisk the eggs to soft peak before adding the lemon juice.
- Next, gradually add the sugar while still whisking until it becomes thick and glossy.
- Then line a few baking trays with baking parchment, then spoon dollops of the mixture onto the trays using a palette knife to spread them to create the feathers and tail of the bird. Be sure to make the feathers at least one millimetre thick lest they crack.
- After this, sprinkle the feathers with glitter and place in an oven to for like two hours or less to enable it to dry well.
- Allow it to cool down before peeling it from the tray using a palette knife.
Step 5 – Making The Royal Icing:
Icing is a sweet mixture of sugar, milk, butter, egg white and is used to cover and decorate cakes. For our swan cake, we need a royal icing as that would give us a smoother and harder icing of the cake. The ingredients you will need for the swan cake icing are:
- 2 large eggs (just whites)
- 3 1/4 cups of icing sugar with extra for dusting
- flavour (optional and any flavour of your choice)
- edible colour (just a little for the extra details on the swan, like the eyes, beak and other details)
Preparation
- For the royal icing, beat the egg whites for a while before adding the flavour if you will.
- Next, add the icing sugar little at a time and mix for about five (5) minutes until it becomes smooth and shiny.
- If it comes out too watery, add more icing sugar. Be careful not to add too much icing sugar so once you notice the texture is thick enough for your spoon to scoop with ease, you stop adding.
- Then, cut out a small part of the icing and place into 2 separate plates. Add one or two different colours you will like the eyes, beak and other details of your swan to be.
- Get piping bags and pour them in to have them handy.
So now you have all the major parts of the swan all baked, the main designing begins.
Assembling your cake to form your swan
With all your swan parts properly baked, gather everything and lay them out where you can easily reach them. You will be working on it part by part so let’s start with the head and neck, which is the gingerbread.
For the head and neck – gingerbread
- Get a piping bag of icing sugar with any of the colours you choose and draw the outlines of the swan’s head onto the gingerbread biscuit with real care.
- Carefully smoothen any mistake with a damp clean paintbrush and allow to sit for ten minutes.
- Get the icing sugar without colour and pipe some onto the neck and body, but avoid the beak and crown. Make sure you fill everything in so it looks smooth.
- Then use a spoon to tease it into the corners, pop any bubbles with a cocktail stick and sprinkle with a little glitter.
- Allow it to dry for thirty minutes until the icing is set hard.
- Once the neck and head have hardened, get some coloured icing and paint it onto the crown and beak.
- Then spray the crown with the glitter and leave to dry before attaching to the head with edible glue. Alternatively, you can use edible paint or food colouring to draw on the eyes or crown using the icing. Or you could use an edible pen to draw the swan’s eyes and other little details.
For the body – cake base
- To set up the body, remove the base cake from the fridge.
- Cut a triangle by trimming the rounded side of the cake and also create a slit for the neck and feathers.
- Then put the cake and the triangle onto a serving plate to create a heart shape before covering up the entire finished cake with the leftover buttercream we saved from before.
- The two separate, but identical spheres of the cake are then sandwiched together with jam and buttercream to complete the picture.
- Now you can get the already designed and hard necks ad head and press it into the slit in the cake starting from the back.
For the feathers/tail – meringue
- Get the feathers and sprinkle with more edible glitter if you choose.
- Gently push the meringue feathers and tail into the buttercream thereby overlapping until you reach the front.
- If it looks to you like it won’t sit well, use an edible glue.
Finishing touches
- With your swan’s head, neck, feather and tail sitting pretty on its body, it is time to complete the look.
- Get the colourless icing sugar and pipe it all over the cake base (body) until every area is properly covered.
- Check for holes carefully and fill them in if you find any.
- Go ahead and sprinkle some more glitter on the body if you want.
- Add any extra details you need but don’t overdo it so you don’t ruin it in the process.
- And voila!!! Your very own swan-themed cake is all done and ready to be displayed to your guests who would definitely watch in awe wondering how you were able to pull it through.
The second baking process with a swan-shaped cake pan:
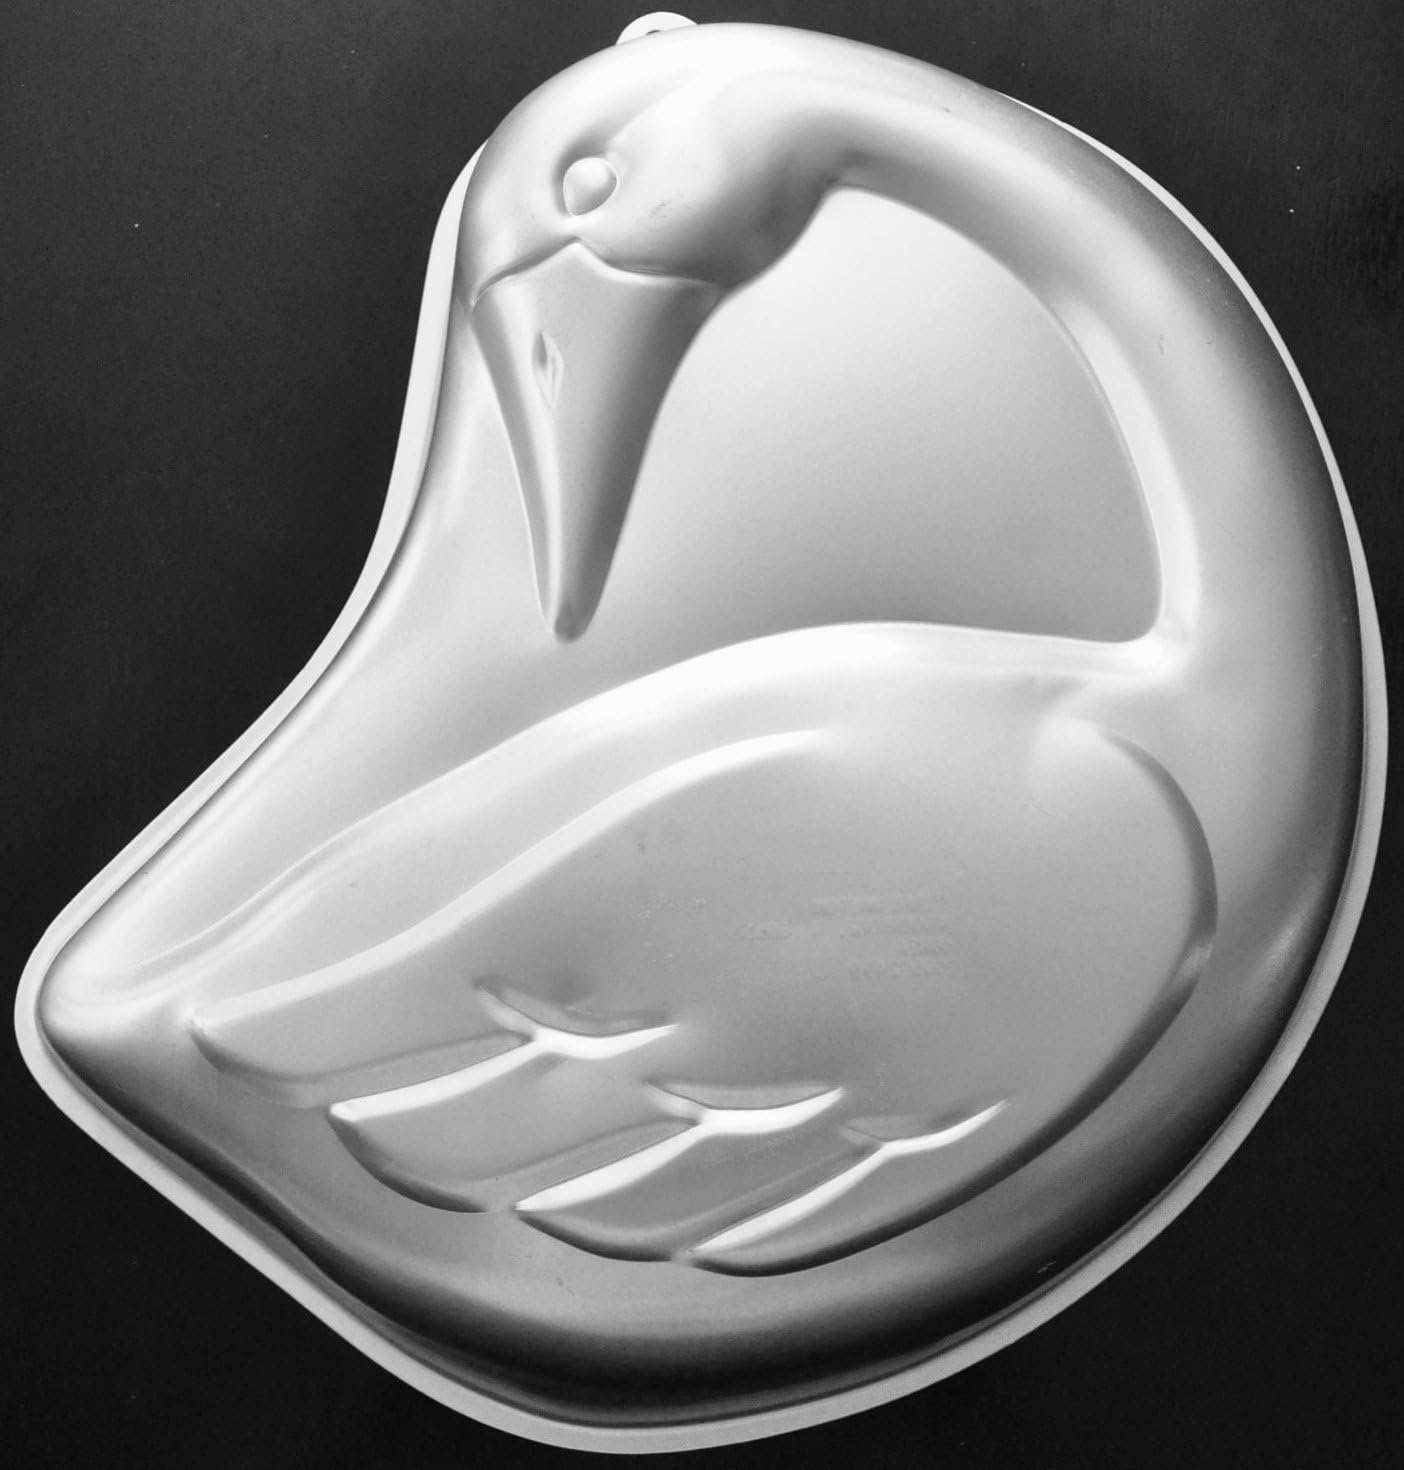
If you have a swan-shaped cake pan like this one and want to go ahead and have everything done by making just the base, here is the simplest way to do that using the first process explained here.
- First, make your cake base using the same recipe mentioned above. The only different thing you will do is to pour your batter straight into your swan-shaped cake pan and bake away.
- Once your cake is properly baked, get it out from the oven and allow int to cool down.
- Then you can skip the gingerbread, meringue and buttercream preparation and jump to the royal icing. Alternatively, you can use the buttercream to decorate the cake but that is entirely up to you.
- Once your icing option is ready, get the cake out and place on the cake board.
- Using a piping bag, spread the icing sugar all over the cake until everything is properly covered.
- Use an edible pen or food colouring to draw on the eyes and colour the beak and crown.
- Once this is done, allow the cake to sit for some minutes to enable the icing to get hard.
- And voila!! Super yummy swan cake is ready!
But if you don’t find a full-sized and swan-shaped cake pan, you can stick to little, cupcake-sized tins that are shaped like swans. Here is one wonderful set I recommend. The whole process of making these cake with this little tins is just the same way as the one above but will require you to work on every single one of the cake tins while baking or decorating.
Bonus baking tip for a swan-inspired cake
Well, let’s just say that there is a chance you did not find a good swan-shaped cake pan or you just couldn’t go through making the swan cake part by part from scratch; I have got a tip for you. You can still have your swan-inspired cake without going over the top to have it from scratch. All you need is your regular baking pan and a swan-shaped fondant mould, a swan-shaped cutter or decoration moulds. Here’s how:
- Start off with baking your cake base in any kind of regular pan you have. Either a full-sized pan or cupcake tins.
- Once it is done, get it out and allow it to cool.
- Get your icing ready and pipe down all around the cake till you fill up every hole.
- The top of the cake should have more icing i.e a thicker layer of icing. Use the swan-shaped cutter to press down on the top of the cake to leave an imprint of a swan.
- If you are using a swan-shaped mould, pour some icing sugar into the mould and once it gets dry, peel it out and place it on top of the cake. You can do as many as you want just to make it look cute. If you want to do more at once, you can use a swan decoration mould to do as much as you want at once and line them up ontop your already iced cake.
- Leave the icing on the cake for a while to dry properly.
- And all done! Your cake with a swan sitting right at the top is ready to be served to the delight of your guests.

Conclusion
Trust me, with this piece of cake art, you are sure to impress your guests. Anyone who casts their eyes on this breathtaking master-class cake piece would definitely love it. It is, without any doubt, the perfect centrepiece for any festivity or birthday fanfare and it tastes even better because it is made with love and also represents lovely creature and traits.
So, what do you think?